Proper R134a A/C Evacuation & Recharge: Step-by-Step DIY Tutorial
リアクション
2026年04月26日
Totally DIY and beginner friendly - Learn how to fix your car's A/C the right way.
Thanks for hanging out with me today guys! If you're interested, you can find the exact A/C gauge set you see me use in the video here: https://amzn.to/4ilGauq
The other items I'm using in the video if you'd like to check them out:
Digital scale: https://amzn.to/3wXYqYK
Safety glasses with splash protection: https://amzn.to/3wXWPCe
Mechanics gloves (the best I've found): https://amzn.to/4cb5ocS
And the best deal on Refrigerant I've found: https://advanceautoparts.rt8x.net/jeb00M (Advance Auto Parts affiliate link)
In this detailed DIY tutorial, I walk you through a complete R134a A/C evacuation and recharge process. This is an updated and even more detailed version of my original viral tutorial, specifically designed to help DIY beginners get professional, "ice-cold" results without the guesswork.
While it's OK to "just add refrigerant" in some cases, in this video we use the proper tools—a manifold gauge set and a vacuum pump—to ensure the system is free of air and moisture, which can create acids that destroy your A/C components.
What You Will Learn in This DIY Step-by-Step Guide:
1. Safety Essentials: You MUST wear gloves and safety glasses to prevent refrigerant frostbite.
2. Environmental Responsibility: Why you should never vent refrigerant into the atmosphere and how to have a shop reclaim it for you.
3. Leak Testing: How to use your gauges to verify the system holds a negative pressure before you add refrigerant.
4. The Proper Vacuum: Why running a vacuum pump for a solid hour is "absolutely crucial" to the process.
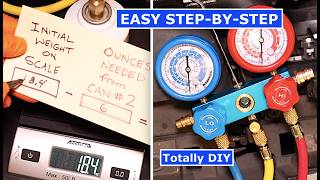
5. The Perfect Charge: How to use a digital scale to hit the exact manufacturer weight (to the ounce!) for a perfect charge every time.
Important tips I touch on:
Purging air from your yellow hose.
Only charging from the LOW side.
Using a fan to simulate driving conditions for accurate gauge readings.
Unlike my previous video where we diagnosed a restriction, this car took the charge perfectly, and I’ll show you exactly what those "perfect" gauge readings should look like.
Intro 0:00
Step 1: Diagnosis 0:36
Step 2: Testing for Refrigerant 3:36
Step 3: Reclaiming Refrigerant 3:57
Step 4: Attaching Manifold Gauges 5:36
Step 5: Testing for Leaks 8:06
Step 6: Deep Vacuum 9:45
Step 7: Precision Charging with Digital Scale 10:43
Final thoughts 22:42
A little note: As an Amazon Associate/Influencer and as a Advance Auto Parts affiliate I earn from qualifying purchases, and that means if you purchase anything from Amazon or Advance Auto Parts a result of clicking on one of my links above, I earn a small commission at no extra cost to you. That means you are helping to support my family just a tad, and I am so thankful.
One last thing: Please be safe when working on your vehicle. Do so at your own risk. I'm not a professional mechanic, I'm simply demonstrating how I work on my own car. Okay, I had to get that out of way, thanks again for your support!
God bless,
Brant
#diy #acrepair #ad
Thanks for hanging out with me today guys! If you're interested, you can find the exact A/C gauge set you see me use in the video here: https://amzn.to/4ilGauq
The other items I'm using in the video if you'd like to check them out:
Digital scale: https://amzn.to/3wXYqYK
Safety glasses with splash protection: https://amzn.to/3wXWPCe
Mechanics gloves (the best I've found): https://amzn.to/4cb5ocS
And the best deal on Refrigerant I've found: https://advanceautoparts.rt8x.net/jeb00M (Advance Auto Parts affiliate link)
In this detailed DIY tutorial, I walk you through a complete R134a A/C evacuation and recharge process. This is an updated and even more detailed version of my original viral tutorial, specifically designed to help DIY beginners get professional, "ice-cold" results without the guesswork.
While it's OK to "just add refrigerant" in some cases, in this video we use the proper tools—a manifold gauge set and a vacuum pump—to ensure the system is free of air and moisture, which can create acids that destroy your A/C components.
What You Will Learn in This DIY Step-by-Step Guide:
1. Safety Essentials: You MUST wear gloves and safety glasses to prevent refrigerant frostbite.
2. Environmental Responsibility: Why you should never vent refrigerant into the atmosphere and how to have a shop reclaim it for you.
3. Leak Testing: How to use your gauges to verify the system holds a negative pressure before you add refrigerant.
4. The Proper Vacuum: Why running a vacuum pump for a solid hour is "absolutely crucial" to the process.
5. The Perfect Charge: How to use a digital scale to hit the exact manufacturer weight (to the ounce!) for a perfect charge every time.
Important tips I touch on:
Purging air from your yellow hose.
Only charging from the LOW side.
Using a fan to simulate driving conditions for accurate gauge readings.
Unlike my previous video where we diagnosed a restriction, this car took the charge perfectly, and I’ll show you exactly what those "perfect" gauge readings should look like.
Intro 0:00
Step 1: Diagnosis 0:36
Step 2: Testing for Refrigerant 3:36
Step 3: Reclaiming Refrigerant 3:57
Step 4: Attaching Manifold Gauges 5:36
Step 5: Testing for Leaks 8:06
Step 6: Deep Vacuum 9:45
Step 7: Precision Charging with Digital Scale 10:43
Final thoughts 22:42
A little note: As an Amazon Associate/Influencer and as a Advance Auto Parts affiliate I earn from qualifying purchases, and that means if you purchase anything from Amazon or Advance Auto Parts a result of clicking on one of my links above, I earn a small commission at no extra cost to you. That means you are helping to support my family just a tad, and I am so thankful.
One last thing: Please be safe when working on your vehicle. Do so at your own risk. I'm not a professional mechanic, I'm simply demonstrating how I work on my own car. Okay, I had to get that out of way, thanks again for your support!
God bless,
Brant
#diy #acrepair #ad